Monday 29 October 2007

Bostini Cream Pie - October Daring Bakers Challenge

a

14 eggs were needed for the October Daring Bakers Challenge! This month we were asked by Mary at AlpineBerry to make Bostini Cream Pie.

For those of you, like me, who’ve never heard of a Bostini Cream Pie it’s basically a light, fluffy orange cake in a smooth cold vanilla custard with a rich chocolate glaze on top.

I have to be straight up with you, I did not like the sound of this, which is probably why I left it to the last minute. All the components separately would have worked for me, but I do as I’m told (most of the time, anyway) and it wasn’t too bad. The part I enjoyed the most was custard I’d never made my own, and was a little worried about all those eggs, but it went fine and the result was delicious and perfect. I’ll definitely be making that again.

If you’d like to see what my fellow friends in the Daring Baker community did with this challenge, have a look here at our blogroll - http://daringbakersblogroll.blogspot.com/

Custard
3/4 cup whole milk
2 3/4 tablespoons cornstarch
1 whole egg, beaten
9 egg yolks, beaten
3 3/4 cups heavy whipping cream
1/2 vanilla bean
1/2 cup + 1 tablespoon sugar

Chiffon Cake

1 1/2 cups cake flour
3/4 cup superfine sugar
1 1/3 teaspoons baking powder
1/3 teaspoon salt
1/3 cup canola oil
1/3 cup beaten egg yolks (3 to 4 yolks)
3/4 cup fresh orange juice
1 1/2 tablespoons grated orange zest
1 teaspoon pure vanilla extract
1 cup egg whites (about 8 large)
1 teaspoon cream of tartar


Chocolate Glaze
225 grams semi or bittersweet chocolate
225 grams unsalted butter

To prepare the custard:
Combine the milk and cornstarch in a bowl; blend until smooth. Whisk in the whole egg and yolks, beating until smooth. Combine the cream, vanilla bean and sugar in a saucepan and carefully bring to a boil. When the mixture just boils, whisk a ladleful into the egg mixture to temper it, then whisk this back into the cream mixture. Cook, stirring constantly, until the mixture is thick enough to coat the back of a spoon. Strain the custard and pour into 8 large custard cups. Refrigerate to chill.

To prepare the chiffon cakes:
Preheat the oven to 160°C. Spray 8 moulds with non-stick cooking spray. You may use 7-ounce custard cups, ovenproof wide mugs or even large foil cups. Whatever you use should be the same size as the custard cups.

Sift the cake flour, sugar, baking powder and salt into a large bowl. Add the oil, egg yolks, orange juice, zest and vanilla. Stir until smooth, but do not overbeat.

Beat the egg whites until frothy. Add the cream of tartar and beat until soft peaks form. Gently fold the beaten whites into the orange batter. Fill the sprayed moulds nearly to the top with the batter.

Bake approximately 25 minutes, until the cakes bounce back when lightly pressed with your fingertip. Do not overbake. Remove from the oven and let cool on a wire rack. When completely cool, remove the cakes from the moulds. Cover the cakes to keep them moist.

To prepare the glaze:
Chop the chocolate into small pieces. Place the butter in a saucepan and heat until it is just about to bubble. Remove from the heat; add the chocolate and stir to melt. Pour through a strainer and keep warm.

To assemble:
Cut a thin slice from the top of each cake to create a flat surface. Place a cake flat-side down on top of each custard. Cover the tops with warm chocolate glaze. Serve immediately.

S

Saturday 27 October 2007

Friands or Financiers

I somehow found myself with an excess of vanilla beans, which in my opinion, is a luxury and therefore something special needed to come of it.

Steph
from http://awhiskandaspoon.wordpress.com/ answered my request with a few ideas and offered recipes if I needed them. One of Steph's offerings was Financiers. I liked the sound of it and got this recipe in return, which is when I realised Financiers are Friands, at least that what I knew them as.

The style of baking was different to any type of cake I'd made in the past, but I quite enjoyed assembling in such a different manner and was extremely pleased with the end result.

I followed the recipe to the letter, and added some chopped strawberries and sliced almonds on top. My Friand tray only holds 6, so I had way too much mixture left over, so I made a little cake too! They were gorgeously soft and moist and just perfect. I will definitely be making these again, thanks Steph.

1 cup almond meal
1⁄2 cup flour
1 vanilla bean
225g unsalted butter
7 egg whites
1 cup icing sugar
1⁄2 cup sugar
1⁄2 tsp salt

Preheat the oven to 180C.

First you need to brown the butter with the vanilla bean. Split the vanilla bean open and empty the tiny black seeds into a saucepan over medium-high heat. Add the vanilla bean and the butter and cook until the mixture caramelizes and emits a rich nutty vanilla aroma. The butter will turn golden and there will be little browned bits on the bottom of the pan. Remove from heat, fish out the vanilla bean, dry it and save it for another use.

Next, in a bowl set over a pot of simmering water, whisk together the egg whites and the two sugars until the whites become warm to the touch and the white sugar has dissolved. Remove the bowl from the heat.

Slowly whisk the flour, ground almonds, and salt into the egg whites. The mixture will become thick and smooth.

Using a ladle, add approximately 1/4 cup of the vanilla brown butter at a time to the egg mixture and whisk until incorporated. Repeat this process until you have added all the butter. This step is very important. You must whisk the butter into the egg mixture slowly making sure that it is incorporated into the batter slowly. Adding the butter too quickly will not emulsify the butter properly which will result in a greasy and heavy cake.

Pour into buttered 10" cake tin or lined muffin/friand cups. Bake at 180C until the cakes are golden brown.

S

Friday 26 October 2007

Oven-Baked Asparagus, Bacon & Basil Risotto

A
After all that risotto talk with our recent blogging event I had a craving for risotto.

It was a lazy Sunday and I adapted an old and trusted recipe of Liz and I's into what I had in the house and came up with this. An oven-baked risotto is so nice, its easy and you don't have to do all that stirring. I don't mind the stir-style, traditional method usually, it does create a different, creamier result, but this baked one is just damn fine when you're lazy and need to fix a risotto craving.

20g unsalted butter
2 tbs olive oil
1 large onion, finely chopped
1 garlic clove, crushed
2 cups (440g) Arborio rice
1 tsp smoked paprika
½ cup red/white wine
1 litre hot chicken stock
Handful fresh basil leaves
2 bunches asparagus, ends trimmed
2 rashers of bacon, diced
½ cup parmesan


Preheat the oven to 180°C.

Heat the butter and 1 tablespoon of the oil in a ovenproof pan on the stove.

Fry the bacon, onion and garlic for about 5 minutes or until soft. Add the rice and paprika and stir.

Add the wine, bring to the boil then simmer, uncovered, for about 1 minute until the wine is absorbed. Now add the stock and cover.

Put the pan in the oven for 20-25 minutes or until the liquid is absorbed and the rice is tender. Stir once during cooking.

Toss the asparagus in the remaining oil and spread on a baking tray with the. Place in the oven for the final 10 minutes of the rice cooking time to cook.

Just before serving, stir the asparagus pieces, basil leaves and parmesan through and serve.

S

Dutch Spiced Cake/Koek

A

I was trying to find inspiration for a blogging event and got totally distracted and discovered a recipe for an old favourite from my country of heritage, Holland which is called Onbijt Koek - which means Breakfast Cake.

This cake, which is more like banana bread-style cake, is very common and popular in Holland. People have it smeared with butter with breakfast or lunch or as a snack. Its a nice and easy recipe, with everything in the cupboards and lasts for a few days if stored properly. Give it a go, its like a honeyish gingerbread.

500 grams self raising flour
150 grams golden syrup or honey
150 grams brown sugar
400 ml milk
2 teaspoons cinnamon
1 teaspoon mixed spice
2 teaspoons baking powder

Mix all dry ingredients together.

Place milk in jug, add golden syrup, place in Microwave for 1 min. Mix thoroughly and blend into the dry mixture.

Bake for 1 hour in fan forced oven on 140 degrees.When cold, slice spread some butter on top and enjoy.

S

Sunday 21 October 2007

Risotto Relay Rundown

Well, its time to judge our very first blogging event - The Risotto Relay, and boy was it tough for the 2 of us to agree on one winner.

We had 14 entries and I reckon I could sit down at the dinner table and enjoy them all. I tell ya, looking at all this risotto means I am craving it and we're having it for dinner here in Sydney on this sunny Sunday.

There is probably more than 14 ways to say yummy but I can't think of them right now, instead take a look for yourself...

So the 1st entry we received was from Brilynn Jumboempanadas with her Prawn/Shrimp & Pea Risotto http://jumboempanadas.blogspot.com/2007/09/defying-logic.html

2nd was Simona from PBJonrye with Pumpkin Risotto http://www.pbjonrye.com/ but we didn't get a copy of a photo and I am unable to get a link to take you directly there, its worth a look though. (Augustina, please email us a photo if you see this and we'll amend it).

3rd was Augustina from Briciole with an idea for leftovers, Risotto-al-salt http://briciole.typepad.com/blog/2007/09/risotto-al-salt.html

4th was Chez Denise from Chezdeniseetlaudalino with Abalone Mushroom Risotto
http://chezdeniseetlaudalino.blogspot.com/2007/09/risotto-relay.html

Number 5 was Gretchen from Canelaycomino with Mushroom Barley Risotto
http://canelaycomino.blogspot.com/2007/10/risotto-relay.html

Number 6 was Lizann from Bitsnbites, Saffron & Prawn Risotto
http://bitsnbites.wordpress.com/2007/10/09/keeping-the-cooking-fires-going/

7th was Lisa from Chefmomcooks made Breakfast Risotto http://chefmomcooks.blogspot.com/2007/10/bacon-egg-risotto.html

Number 8 was Zuzana from Burntmouth made Mushroom & Wine Risotto
http://www.burntmouth.com/2007/10/mushroom-wine-risotto.html

Number 9 , Annemarie from Divineambrosia had 2 entries, one was Annemarie, Squid Paella & Pumpkin & Sage http://divineambrosia.blogspot.com/2007/09/squid-paella.html


Next to arrive was Kevin from Closetcooking with Pear & Gorgonzola Risotto
http://closetcooking.blogspot.com/2007/10/pear-and-gorgonzola-risotto.html


The last entry to land in our inbox was the sweet Steph, from Whisk & a Spoon
http://awhiskandaspoon.wordpress.com/2007/10/20/risotto-relay-baked-risotto/

And now for the winner, Deborah from Workingwomanfood! This was Deborah's 1st time with a risotto Liz and I were both amazed at how good it looked for a first timer. Well done Deb - we love you! Expect some famous Aussie Tim Tams in the mail soon. Deb made Chicken, Mushroom & Cashew Risotto which you can see here -
http://workingwomanfood.blogspot.com/2007/10/chicken-mushroom-and-cashew-risotto.html

Friday 19 October 2007

Stuffed Potatoes

I'm unsure how this came up in conversation, and I'm unsure of where these yummy things come from (the US, maybe?) but I got the run down and had been itching to make them for ages, and finally did last night.

Although it took a little while, as the potatoes were so large, they were well worth the wait and tasty and creamy. Personally, I think they're the perfect, cos you get a little mash and little baked potato, all you need is fries. Heehee.

Here's what I did, but you can and or subtract as much as you like to make them to your taste.

4 large potatoes
2 large tbs sour cream
handful grated cheddar cheese
2 spring onions, finely sliced
1 tbs butter
2 bacon rashers, diced
Salt & pepper
Aluminium foil


Preheat oven to 200C. Wrap potatoes in alfoil and bake until cooked through.

Fry the bacon until crispy and drain on paper towels.

Remove from the oven and allow to cool. Slice off the top of the potatoes, scoop out the flesh, and mix with butter, sour cream, cheddar, and salt and pepper.

Spoon the potatoes back into their shells, and bake again for a few minutes, before serving garnished with the bacon and spring onions.

S

Thursday 18 October 2007

Mushroom Curry

A


Whenever I get the opportunity to cook for my parents, without my sisters, I almost always make something with mushrooms, as I know they love them and my sisters hate them. My Dad mentioned a few times, the Palak Paneer I posted recently made his mouth water which I took as a subtle hint that I should make it for them while they were here, so I did, and I made this along side it, as I had to keep up the mushroom tradition and we all love a good mushroom curry. The recipe below is how I made it, but next time I think I would only do half a cup of water as I think it watered it down too much. Or you could go all out and do cream. Mmm.

300 grams button mushrooms, cut into halves)
150 grams oyster mushrooms
1 onion, chopped
1 tomato, diced
3 cloves garlic, crushed
1 small piece Ginger, grated
1 tsp chilli powder
1 tsp ground coriander
Salt
Oil
3 tablespoons yoghurt
Fresh coriander, chopped

Grind/process the ginger, garlic & onion with very little water to a make a smooth paste.

Fry the mushrooms on a hight heat for a few minutes and set aside.

In a pan, fry the ginger, garlic and onion mix in a little oil on low. Add the yoghurt 1 tablespoon at a time, and fry for 2 minutes.

Then add the tomatoes, ground coriander, chilli and salt and fry for a minute.

Add the fried mushrooms and a 3.4 cup of water and stir well.

Lower the heat and allow to thicken.

Garnish with chopped coriander leaves and serve.

S

Wednesday 17 October 2007

A Special Asparagus Tart

a
Someone very near and dear to me passed away a few years ago and a few days before this happened she woke up from her awful state and rattled off this asparagus tart recipe. This strange little incident has come up in conversation many times over the years, but I’ve never made it.

As I mentioned, Mum was here in Sydney with me this weekend and asparagus is in season and delicious at the moment. So I got the details of what to do from Mum and made it and it was perfect. I had looked around in the past few weeks for a decent recipe but none stuck out for me. It was nice and easy to prepare and was very tasty along side the tomato salad.

1 piece of frozen shortcrust pastry
1 bunch of asparagus
1 onion, finely chopped
2 garlic cloves, crushed
1 tsp olive oil
5 eggs
¼ cup milk
¼ tsp cayenne pepper
½ tsp nutmeg
pepper
1 cup grated fontina cheese


Preheat the oven to 180C.

Grease a quiche tin and press the pastry into the tin and fill in the cracks and gaps and set aside.
Steam the asparagus for a few minutes and refresh in cold water and set aside.

Fry the onion and garlic in the oil on low heat for 5 minutes till translucent and soft.

Beat the eggs with the milk, nutmeg, cayenne pepper, pepper and the onion and garlic mix.

Place the asparagus in the tart shell and gently pour over the egg mix. Top with the grated cheese and place in the oven for 25 minutes.
When golden brown and firm, remove from the oven and allow to cool for 5 minutes and serve.
S

Tuesday 16 October 2007

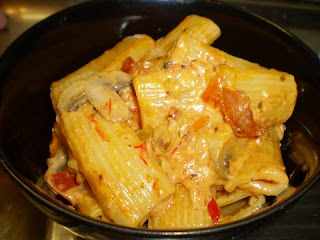
Creamy Sundried Tomato Pasta


A few months ago I was on the Atkins Diet and was not allowed to eat carbs. Dave and Monique, our dear in laws, cooked this pasta dish for me and Andy. Being on Atkins I was not permitted to eat it, but it looked so good that I had a serve of the sauce, without the pasta. I nearly died - it tasted so good! You know how now and then you taste something that is just phenomenal? Bursting with flavour? You can actually feel your tastebuds dancing?? Well this is one of those dishes!

I decided to recreate it last night. Dave and Mon had shared the list of ingredients with me, but I hadn't asked measurements. I put it together with guesstimations and I think it turned out pretty close to perfect. I ate two bowls worth! And I cannot wait to get home tonight to have a third! I added quite a bit of chilli as I like my meals very hot. But you can, of course, add as much or as little as you like. mmm.
I really felt that no matter how many photographs I took, it did not do justice to this magnificent meal. So you'll just have to try making it yourselves!

500g penne pasta
Olive oil
175g bacon, chopped into small squares
1 bunch of spring onion, finely sliced
2 cloves of garlic, crushed
1 teaspoon paprika
4 mushrooms, sliced
3 teaspoons fresh chilli, chopped
1 jar Leggo's Sundried Tomato & Roasted Garlic Stir Thru Sauce
400ml cream

Fry off the bacon until crispy and to your liking. Set aside draining on paper towel.

Boil pasta as per directions on the pack.

In a large fry pan, fry off spring onion and garlic until soft in a small amount of olive oil. Add the mushrooms and continue to fry for a minute or two. Add the sundried tomato stir thru sauce. Add the paprika and chilli. Allow to heat until it begins to simmer. Add the cream and stir. Allow to simmer for fifteen minutes, stirring occasionally, allowing to thicken.

Drain the pasta and place back in the pot. Pour the sauce over the pasta and stir through. Add the bacon. Serve.

E.

Monday 15 October 2007

Neil Perry’s Lemon and Yogurt Cake

a


A friend, whom I highly regard in the kitchen sent me this recipe and said I must try it.

My parents came over to spend the weekend with us so I thought it was a good chance to try it out.

I’m not sure if the end result was as it was meant to be, as I had nothing to compare it with. I think maybe it should have risen more. It had an airy cheesecake texture, it wasn’t too sweet and had a gorgeous subtle lemon flavour which went perfectly with the vanilla infused strawberries and cream. It was nice to taste and try something different from my usual baking.

4 eggs, separated
155 g caster sugar
3 tablespoons flour
400 grams Greek-style yoghurt
2 lemons
icing sugar
whipped cream
2 punnets strawberries, sliced
1 vanilla bean


Preheat the oven to 180 C and butter and line a 22 cm spring-form pan with paper.

Beat the yolks with 100 grams caster sugar until thick and pale.

Beat in the flour, and then the yoghurt, half the lemon zest, and half the lemon juice until thoroughly blended.

Beat the egg whites until stiff, fold them into the yogurt mixture, pour into the prepared pan and back for 25 minutes.

After 25 minutes cover with foil and bake for another 25 – 35 minutes before cooling on a rack, and sliding off the paper.

Mix together the strawberries, 55 grams caster sugar, the remaining lemon juice and zest, and the seeds and bean of the vanilla, and allow it to soak and sit for several hours.

Dust the cake with icing sugar and serve in wedges with the fruits and whipped cream.

S

Thursday 11 October 2007

Creamy Asparagus & Fontina Pasta

a

Something very unusual happened last night, I was given an early minute. It’d been a pretty yuk day, so when I got home all I wanted was something tasty and comforting. Me? Comfort-eater? No! Where’d you get that idea from!?

With nothing definite in mind, I pulled a few things out of the fridge while gossiping on the phone to a dear friend and came up with this. And yes, if you’re wondering, it hit the spot! Yum.

200ml evaporated milk
2 cloves of garlic, finely chopped
4 rashers bacon, diced
Asparagus, chopped into pieces
Handful of grated fontina cheese
3 tomatoes, diced
½ tsp dried oregano
½ tsp dried mint
Salt & Pepper
300grams fresh casarecci


Fry off the bacon, till nice and crispy and set aside.

Meanwhile, cook the pasta according to instructions. (You don’t need to use fresh pasta, of course).

Next, fry the garlic in a little oil for a few seconds, add the asparagus and stir. To this, add the evaporated milk, oregano, mint and season. Allow to simmer and reduce a little.

When the pasta is ready, drain and set aside for just a second. Add the grated cheese, crispy bacon, diced tomatoes to the pasta sauce and stir.

Check the seasoning of the sauce and when you’re happy with it, add to the pasta and stir thoroughly and serve.

S

Wednesday 10 October 2007

The Woman's Got Taste...


Jamie Oliver called this gorgeous recipe "Jool's Favourite Beef Stew" and by golly does Jool's have taste. It is so delicious. As soon as you put it all together in the pot the aroma fills the kitchen. The unfortunate thing is that you have to wait at least three hours to taste it!!

The recipe makes loads so Andy and I have been enjoying it for three days now! We had it with hot crusty bread and it was so moreish and flavoursome and warming! You've got to try it!


Olive oil
a knob of butter
1 onion, peeled and chopped
a handfull of fresh sage leaves
800g stewing steak (I used gravy steak)
sea salt and fresh ground black pepper
flour to dust
3 parsnips, peeled and quartered
4 carrots, peeled and halved
1/2 a butternut pumpkin, seeded and roughly diced
500g small potatoes, roughly diced
2 tablespoons tomato puree
1/2 a bottle red wine
285ml beef stock
zest of 1 lemon
a handfull of rosemary leaves, picked
1 clove garlic, peeled and finely chopped


Preheat the oven to 160 degrees. Put a little oil and your knob of butter into an appropriately sized pot or casserole dish. Add your onion and all the sage leaves and fry for 3 or 4 mins. Toss the meat in a little seasoned flour, then add it to the pan with the vegetables, the tomato puree, wine and stock, and gently stir together. Season generously with freshly ground black pepper and sea salt. Bring to the boil, place a lid on top then cook in the preheated oven until the meat is tender. Sometimes this takes three hours, sometimes four - it depends on what cut of meat you're using and how fresh it is. Once it's cooked, you can turn the oven down to about 110 degrees and just hold it there until you're ready to eat it.

The best way to serve this is by ladling big spoonfulls into bowls and some really fresh, warmed bread. Mix the lemon zest, chipped rosemary and garlic together and sprinkle over the stew before eating. Just the smallest amount will make a world of difference - as soon as it hits the hot stew it will release an amazing fragrance.

E.

Tuesday 9 October 2007

Coconut Green Beans

This curry is more like a stirfry I guess. Toasted spices with shredded coconut and crisp sweet green beans. It only takes a few minutes and is delicious. It can also be done with cabbage, which is even quicker.

1 tbs oil
½ tsp mustard sees
1 onion, finely diced
1 garlic clove, finely chopped
1 tbs shredded coconut
¼ tsp cumin seeds
¼ tsp turmeric
2-3 large handfuls of green beans or quarter cabbage
2 tbs urad dhal
4 curry leaves
Salt to taste


Heat a wok or large pan and add the oil. Fry the mustard seeds and urad dhal till the mustard seeds pop.

Add the garlic and onion and fry gently for a minute.

Add the cumin seeds, turmeric, curry leaves and green beans (or cabbage) and stirfry. Add the coconut and cook, covered for 5 minutes. Check seasoning.

Serve with toasted coconut.

S

Monday 8 October 2007

Palak Paneer

Curry fest was on at my place this weekend in celebration of my sister coming up to see us.

Palak Paneer, also known as Sag Paneer is an old favourite in our family, and is always ordered when we go out for Indian. Until recently, I’d never tried to make it. The problem now is, that I have found the perfect recipe and its far too easy and way, way too tasty.

Paneer is very mild Indian cheese, which can now be bought at the supermarket. Its soft, with not a lot of flavour, similar to ricotta if I had to compare it to something. The combination of the cheese with the spiced, creamy spinach are a match made in heaven if you ask me, or anyone else in my family. There was no leftovers, so I think everyone agreed.

400 grams paneer, cut into small cubes
vegetable oil
800 grams spinach, well washed and drained
ghee
1 teaspoon cumin seeds
3 cloves garlic, finely chopped
2 teaspoons ground coriander
1 teaspoon chilli powder
Salt
100 mls cream

Fry the paneer in a little oil until golden and then set aside.

Stir-fry the spinach with a knob of ghee and then puree.

Fry the cumin seeds in 100 grams of ghee until they crackle and then stir in the chopped garlic and sauté.

Add the coriander, chilli powder and spinach puree, season with salt, and stir-fry for 4 minutes.

Add the paneer and simmer gently to heat through, and then stir in the cream.

S

Sunday 7 October 2007

Jelly Cakes

Jelly cakes have always been on the top of my list of favourite treats, and I discovered this weekend, while staying at my parents house, that they are my mum's number one favourite treat! So she was very excited I was making them!

I decided I would make them for a Daring Bakers Challenge being hosted by http://www.apronstringsandsimmeringthings.blogspot.com/ called the Boobie Bake Off. We had to make something Pink! So jelly cakes were perfect! They are so easy and so delicious! I've always bought mine from a bakery in Adelaide called Villi's, which is incredibly popular, and these jelly cakes taste exactly the same.

I would suggest doubling the mixture though as the recipe below only made ten. Thus, they lasted about two minutes...

60g butter, softened
1/2 cup caster sugar
1 egg, lightly beaten
1 cup self-raising flour
2/3 cup milk
85g packet raspberry jelly crystals
1 cup boiling water
1 cup cold water
3 cups desiccated coconut
1/2 cup double thick cream

Using an electric mixer, cream butter and sugar until light and fluffy. Add egg, a little at a time, beating until well combined. Using a large metal spoon, gently fold in half the flour and half the milk. Repeat with remaining flour and milk.

Spoon mixture into patty pan. Bake for 15 to 20 minutes or until a skewer inserted into the centre comes out clean. Cool cakes on a wire rack.
Stir jelly and boiling water together in a bowl until crystals are dissolved. Stir in cold water. Refrigerate for 1 hour or until cold and slightly thick.

Place coconut into a large bowl. Cut each cake in half horizontally. Sandwich halves back together using 1 teaspoon of whipped cream. Using a slotted spoon lower cakes, 1 cake at a time, into jelly. Drain excess jelly. Toss cakes in coconut until well coated. Place onto a lined tray and refrigerate for 30 minutes or until set.

E.

The Best Chicken Sandwiches

These chicken sandwiches are in my Donna Hay cookbook which my wonderful parents gave me for my birthday recently. As soon as I saw the sandwiches I thought, I've got to make these! And as Donna Hay says, "they aren't just chicken sandwiches, they are the best chicken sandwiches!"

Then I saw a challenge on the daring bakers being hosted by http://www.ayearatoakcottage.blogspot.com/ called Show Us Your Sarnie and thought it was the perfect excuse to make these delicious sandwiches.

I was a little worried that they may be a bit girly and herby for the hard working men I was feeding them to, but I made seven sandwiches to feed four men, and they all went. Every last bite. Words the men used to describe them included "delicious" and "refreshing". I tried them and was delighted with the flavour. I'll absolutely be making them again!

12 slices white bread
Butter for spreading
2 cooked chicken breasts, skinned and chopped
6floz/170ml mayonnaise, plus extra for spreading
2 tbsp lemon juice
2 tbsp chopped basil leaves
2 tbsp shredded mint leaves
Salt and pepper
6 tbsp finely chopped chives


Spread butter on one side of the bread.
Combine the chicken, mayonnaise, lemon juice, basil and mint, and season with salt and pepper.
Divide between half the bread slices and top with the remaining bread. Cut into small triangles and spread one edge with the remaining mayonnaise.
Press one side into the chives and serve.

E.

Banana & Walnut Cake

I spent Friday and Saturday night at my parents Olive Grove again this weekend. Andy came too which was lovely. I'm sure he regretted it once he reaslied dad and his mate Don were paving the entire perimeter of the house - the house being 38 metres long!

And so while the boys worked hard I spent the day in the kitchen. Mum had some old bananas so we decided to use them and bake a cake. We used two bananas instead of one and made two cakes.
As you can see from the photos the sun was just setting as I finished icing them. It was a beautiful day in the Clare Valley. An entire cake was eaten after our roast pork dinner. The icing was delicious!

90 g butter
1/3 cup sugar
1egg
1 large banana
1 teaspoon lemon juice
1 ¼ cups self raising flour
pinch salt
1/3 cup plain yoghurt
2 tablespoons finely chopped walnuts

Icing
125g philli cheese
2 cups icing sugar
1 tablespoon lemon juice

Beat butter and sugar until light and creamy. Add lightly beaten egg, beat well. Stir in combined peeled, mashed banana and lemon juice. Fold in sifted dry ingredients alternately with yoghurt. Stir in half the chopped walnuts, mix until smooth. Spoon mixture into greased and greased paper lined 25 cm x 8 cm (10in x 3 in) bar tin, sprinkle with remaining walnuts.
Bake in moderate oven 40 minutes or until cooked when tested. Allow cake to cool 5 minutes in tin, turn out and cool on wire rack.

To make the icing. Beat the three ingredients together until smooth and delicious. If it is too runny, add more icing until it is at the consistency you require. E.

Friday 5 October 2007

Lamb Curry

I had been trying to make this curry for weeks! But everything was working against me as things kept coming up, people kept cancelling or time did not permit! But I'd seen the photo in my Marie Claire cookbook and knew I had to make it! It just looked so tasty! And so last night was the night! I bought all the ingredients, and prepared the kitchen - and then read the method and realised the meat needed to marinate for three hours!! By this stage it was 4pm! I wanted it on the table before midnight!! So I opted to marinate for an hour and a half and it was still so lovely. The recipe also asks for 2 teaspoons of garam masala but I added about a tablespoon. Two teaspoons just didnt seem enought to me....

In the end it was absolutely lovely. And I think my photo turned out looking very similar to the one in the cookbook - without all the arty farty talent that their photographer obviously had! Andy said it was the best curry I've ever made! (I've only made 5 mind you...) But still, a compliment. Very quick and easy to get it all in the pot and mixed together (once the 3 hours of marinating is over that is), and the result is very much worth it!

1kg Lamb shoulder, trimmed and cut into cubes
3 tablespoons olive oil
juice of 2 lemons
1 tablespoon finely grated fresh ginger
2 teaspoons garam masala
2 onions, finely chopped
400g chopped tomatoes
2 tablespoons tomato paste
3 green chillis, seeded and cut into strips
250ml beef stock
10 mint leaves, finely chopped
300g plain yoghurt
steamed basmati to serve


Put the lamb cubes into a large ceramic dish and add 2 tablespoons of the oil, the lemon juice, ginger and garam masala. Massage teh ingredients into the lamb to ensure it is well coated. Cover with plastic wrap and allow to marinate for 3 hours in the refrigerator.

Heat the remaining oil in a large heavy based saucepan and add the onion. Cook for a few minutes until the onion is soft then add the lamb - depending on the size of your pan you may need to cook the lamb in two separate batches. Cook for several minutes until browned. Add teh tomato, tomato paste, chilli and stock and return the rest of the lamb to the pan if necessary. Allow to simmer, stirring occasionally over a low heat for 1 1/2 hours, or until the liquid has reduced and the lamb is coated in a rick, thick sauce.

Meanwhile, stir the mint leaves into the yoghurt. Serve the lamb spooned over steamed rice with a dollop of minty yoghurt. Serves 4


E.

Thursday 4 October 2007

Vanilla Bean Cupcakes with Strawberry frosting

a
In the back of my mind is a recipe I would like to attempt soon. This recipe needs a vanilla bean. I struggled to find a vanilla bean this past weekend, but as usual as I gave up I came across them, but could only buy a pack of 5. What to do with the rest of the beans… I know, what a luxury to have excess vanilla beans! Cupcakes of course, soft, girly pink cupcakes, with the gorgeous comforting taste of real vanilla.

2 cups flour
1/2 cup butter, at room temperature
1 cup sugar
1 vanilla bean, cut length-wise
3/4 cup milk
1 egg
1 tsp salt
2 tsps baking powder
Frosting:
2 cups icing sugar
3 large tbsp of strawberry jam
Drop of pink food colouring
3 tbsp of butter


In a small saucepan, heat the milk and vanilla bean together until the milk just boils. Remove from heat and let cool for about 1 hour. Next, remove the vanilla bean. Scrape out the seeds from the vanilla bean and return them to the milk. Discard the remaining bean pod.

Meanwhile, preheat the oven to 180C.

Combine the salt, flour and baking powder.

In another bowl, cream together butter and sugar until light and fluffy. Add egg and beat well.
Add the flour and milk mixture bit by bit until well combined.

Divide batter into about 20 pattypans.

Bake 15-20 minutes. Cool on a wire rack.

To make the frosting, put all ingredients in the food processor and whiz till combined. Add a little warm water if its too thick. Swirl onto cupcakes and serve.

Note: I brought a few into work and thought you might like my view on this gorgeous day over looking the Sydney Harbour Bridge.

S

Tuesday 2 October 2007

Farfalle with Carbonara and Spring Peas

Yesterday was a public holiday here in Adelaide. Andy was playing computer games on my mobile so I couldn't get any conversation out of him at all. Eventually, after talking to myself for an hour, I started thinking about food and what I should cook for dinner. The decision was made to do a pasta, and Andy pulled himself away from his game long enough to say he wanted Carbonara. Carbonara is something I have never cooked before, although my sister in law Catherine has cooked it for me on a few occasions and it has always been perfect and delicious. But I have always been told to mix it up and serve it quick or it will be like scrambled eggs. I think for that reason, I have always avoided cooking it. I found a few basic recipes for Carbonara, but decided to go with a Jamie Oliver version which was a little different. It was really yummy and so simple. The flavours are so subtle and the peas really do burst in your mouth. I'm already looking forward to having the left overs this afternoon.
455g farfalle
1 egg
100ml double cream
sea salt and freshly ground black pepper
12 rashes of pancetta or smoked streaky bacon, rouchly sliced
3 handfuls of fresh podded or frozen peas
2 sprigs of fresh mint, leaves picked
2 handfulls of freshly grated parmesan cheese

Bring a large pan of salted water to the boil. Add the farfalle and cook according to the packet instructions. Whisk the egg in a bowl with the cream, salt and pepper. Put your panchetta or bacon into a second pan and cook until crispy and golden.

When the farfalle is nearly cooked, add the peas for the last minute and a half. This way they will burst in your mouth and be lovely and sweet. When cooked, drain in a colander, saving a little of the cooking water. Add the pasta to the pancetta and stri in most of the mint, finely sliced - if the pan isn't big enough, mix it all together in a warmed bowl.

Now you need to add the egg and cream mix to the pasta. What's important here is that you add it while the pasta is steaming hot. This way the residual heat from the pasta will cook the egg, but make sure they do not resemble scrambled eggs. The egg will actually cook enough to give you a silk smooth sauce. Toss together and loosen with a little of the reserved cooking water if necessary. Season with salt and pepper, sprinkle with parmesan and the rest of the mint leaves and serve as soon as possible.

E.

Monday 1 October 2007

Cinnamon/Sticky Buns – Daring Bakers Sept Challenge

It that’s time of the month again, where we can finally post our next Daring Bakers challenge.This month we made Cinnamon/Sticky scrolls or buns. Yum I hear you say!? Yes, they are sensational! One thing I discovered is that cinnamon scrolls, are many peoples favourite.

I would never have had the guts to try these in the past, and I think my procrastinating proved I was a little anxious about it. However, it was not too hard as I thought, and the whole process was totally worth it, and I think of my 3 challenges the easiest.

We were asked to make one type of scroll with 2 different toppings, one being white fondant icing and the other a sticky gooey caramel. They’re both delicious but I think I preferred the fondant covered scrolls, or should I say I could eat more of them! The caramel is incredibly rich, but tasty.

If you would like to see what my other Daring Baker team mates have gone with this challenge, you can find them all here. http://daringbakersblogroll.blogspot.com/

6 1/2 tablespoons sugar
1 teaspoon salt
5 1/2 tablespoons unsalted butter
1 large egg, slightly beaten
1 teaspoon lemon zest
3 1/2 cups all-purpose flour
2 teaspoons yeast
1 1/8 - 1 1/4 cups whole milk or buttermilk, at room temperature
1/2 cup cinnamon sugar (6 1/2 tablespoons granulated sugar plus 1 1/2 teaspoons ground cinnamon)
White fondant glaze for cinnamon buns or caramel glaze for sticky buns (at the end of the recipe)
Walnuts, pecans, or other nuts (for sticky buns)
Raisins or other dried fruit, such as dried cranberries or dried cherries (for sticky buns, optional)

Cream together the sugar, salt and butter in a large mixing bowl and do it by hand). Whip in the egg and lemon zest until smooth. Then add the flour, yeast, and milk.

Mix until the dough forms a ball. Knead for 12 to 15 minutes or until the dough is silky and supple, tacky but not sticky. You may have to add a little flour or water while mixing to achieve this texture. Lightly oil a large bowl and transfer the dough to the bowl, rolling it around to coat it with oil. Cover the bowl with plastic wrap.Ferment at room temperature for approximately 2 hours, or until the dough doubles in size.

Mist the counter with spray oil and transfer the dough to the counter. Roll out the dough with a rolling pin, lightly dusting the top with flour to keep it from sticking to the pin. Roll it into a rectangle about 2/3 inch thick and 14 inches wide by 12 inches long for larger buns, or 18 inches wide by 9 inches long for smaller buns. Don´t roll out the dough too thin, or the finished buns will be tough and chewy rather than soft and plump. Sprinkle the cinnamon sugar over the surface of the dough and roll the dough up into a cigar-shaped log, creating a cinnamon-sugar spiral as you roll. With the seam side down, cut the dough into 8 to 12 pieces each about 1 3/4 inches thick for larger buns, or 12 to 16 pieces each 1 1/4 inch thick for smaller buns.)

For cinnamon buns, line 1 or more sheet pans with baking parchment. Place the buns approximately 1/2 inch apart so that they aren’t touching but are close to one another.

For sticky buns, coat the bottom of 1 or more baking dishes or baking pans with sides at least 1 1/2 inches high with a 1/4 inch layer of the caramel glaze. Sprinkle on the nuts and raisins (if you are using raisins or dried fruit.) You do not need a lot of nuts and raisins, only a sprinkling. Lay the pieces of dough on top of the caramel glaze, spacing them about 1/2 inch apart. Mist the dough with spray oil and cover loosely with plastic wrap or a food-grade plastic bag.

Proof at room temperature for 1 to 1 ½ hours or until the pieces have grown into one another and have nearly doubled in size.

Preheat the oven to 175°C with the oven rack in the middle shelf for cinnamon buns but on the lowest shelf for sticky buns.

Bake the cinnamon buns for 20 to 30 minutes or the sticky buns 30 to 40 minutes, or until golden brown. If you are baking sticky buns, remember that they are really upside down (regular cinnamon buns are baked right side up), so the heat has to penetrate through the pan and into the glaze to caramelise it. The tops will become the bottoms, so they may appear dark and done, but the real key is whether the underside is fully baked. It takes practice to know just when to pull the buns out of the oven.


For cinnamon buns, cool the buns in the pan for about 10 minutes and then streak white fondant glaze across the tops, while the buns are warm but not too hot. Remove the buns from the pans and place them on a cooling rack. Wait for at least
20 minutes before serving.

For the sticky buns, cool the buns in the pan for 5 to 10 minutes and then remove them by flipping them over into another pan. Carefully scoop any run-off glaze back over the buns with a spatula. Wait at least 20 minutes before serving.
a
White fondant glaze for cinnamon buns
Sift 2 cups of powdered sugar into a bowl. Add 1/2 teaspoon of lemon or orange zest and 3 tablespoons to 1/4 cup of warm milk, briskly whisking until all the sugar is dissolved. Add the milk slowly and only as much as is needed to make a thick, smooth paste.When the buns have cooled but are still warm, streak the glaze over them by dipping the tines of a fork or a whisk into the glaze and waving the fork or whisk over the tops. Or, form the streaks by dipping your fingers in the glaze and letting it drip off as you wave them over the tops of the buns.
a
Caramel glaze for sticky buns
With an electric mixer, combine 1/2 cup sugar, 1/2 cup firmly packed brown sugar, 1/2 teaspoon salt, and 1/2 pound unsalted butter, at room temperature. Cream together for 2 minutes.Add 1/2 cup golden syrup and 1 teaspoon lemon or orange zest. Continue to cream for about 5 minutes, or until light and fluffy.Use as much of this as you need to cover the bottom of the pan with a 1/4-inch layer.

S